Sunday, December 20, 2009
Sunday, November 29, 2009
Johannes in action. Animating this scene is getting a bit tedious. I'm almost at that dangerous 'I know how the thing looks now so the magic is gone' stage. Which makes it harder to work.
I think Johannes looks pretty good from profile. I'm going to try to show him from this angle as much as possible.
The idea with this little sequence is that you hear the tied-up guy making i'm-tied-up sounds, but you can't tell what it is. Suspense or something.
 Not thrilled with the way Johannes turned out (the new guy in the pictures). Attempt #3 on the face got a pass. Impatience and trying to hurry things up wrecked the first two.
He looks like a pouting pig-monkey.
But I like his hat. And his cross-chest-buckle cape thingy. I made it so the over-the-shoulder shots (see bottom picture) would look good.
Wednesday, November 25, 2009
Some shots from scene 4 with the missing background put in. I like them allright. They seem less dark with the background in there for some reason.
Otherwise, i've been shooting the backgrounds for the next scene, making props (Cornelisz has some items in this scene) and working on Johannes. Could have been done already, but I blew it with his mask. Was in too much of a hurry - now I have to do it over. Really hoping I can be filming him by Thursday. May not happen though.
Saturday, November 21, 2009


Scene 11 background plates, all in the bag. Shot all the ones I need, and all the ones I could think of. A bit brighter than the last scene. More fill overall.
I'm getting much better and faster at this; for the background plates in the last scene, there was days of festering and light-nudging and mind-changing. I lit this one up in 10 minutes. Though I did do some tests at an earlier date.
Also, when processing all the photos, I put the results into an After Effects composition with a character to see how they fit. The tendency is to make them look like nice pictures on their own; that's not the point. They have to be pretty muted so that they don't compete overmuch with the characters visually. So I ended up muting the whites and softening the blacks.
Thursday, November 19, 2009


Sunday, November 15, 2009

Monday, November 09, 2009
This scene is turning into a real monster. I originally thought it would be minute or so. Now it's apparent it's going to clock in at 2 1/2, minimum. These shots are almost all real hard; the one wherein the bird lunges took 5 hours of practice animation and prep work. But i'm knocking them down one after the other, in one take.
The one where he stands up and turns around with the bird real slow was a lesson; wasted alot of takes before I bore down and really figured out.
The animation ain't fabulous, but i'm okay with it. Looks like puppet animation.
I scrapped the shot (see previous video clip) where he swishes the bird around. Too odd, and the bird looked almost cute. Can't have that.
Friday, November 06, 2009


Bird is ready to go. Did a few animation tests. It's a real bitch. Not the armature, or the fact that it's covered with feathers (though those things don't help). It's hard to make it move in a bird-like fashion. The bottom picture is the bird with HDR, or how it's roughly going to look (will be more painterly effects) in the painting.
Sunday, November 01, 2009


The background for the main angle has been bugging me. I think I found out how to make it work, though. Made it lighter, grayer, darkened the area behind Cornelisz, and made the gradient on the left (haze) stronger. And most importantly, ran a 'remove grain' filter on it in AE. That fixed it right up. It's hard to tell in a small picture, but it a full size 1920x1080 frame, it looked a bit rough.
Sunday, October 18, 2009

Wednesday, October 14, 2009
Currently upgrading 'Cornelisz'. Fixing all the stuff that's been bugging me. New mask, new hair, new sleeves, extra body bulk, etc. Also revamped the animatronic face movement. Gonna be controlled via dials on a little control panel. Vastly superior to the first barely-working version.
Bird is also almost done. Not brilliant, but pretty reasonable-looking.
Back in the studio Thursday. Corn's sleeves might be too light (almost white). Besides making him too 'busy' looking, they're also serious spill-bait.
Bird is also almost done. Not brilliant, but pretty reasonable-looking.
Back in the studio Thursday. Corn's sleeves might be too light (almost white). Besides making him too 'busy' looking, they're also serious spill-bait.
Sunday, October 04, 2009
Wednesday, September 30, 2009
Monday, September 28, 2009
One of our Lowell hotlights fried yesterday. A wire was rubbing against something. Shorted out, melted a hole, stopped working. Just when we were finally ready to really go full-steam ahead. We had to light the bluescreen with one light. We tested it and found it keyable, though. Nothing every works perfectly it seems.
The garbage matte is cutting off a wee bit of his head. Just a quick little comp. We like it. We've established a quality level; not spectacular, but we like it. We did 7 shots yesterday. They're just the model huffing and puffing with some head movements, but hey. That's alot of stuff in the bag for one day. Gonna see if we can't polish off his shots within a few days.
Friday, September 25, 2009
 I was having a hard time with the arms; there's tension on them due to the rope. I remembered something I saw from the 'making of' of an old Japanese stop motion. I trick they were using to animate moving grass. Works real good. Just secured a thread spool with a nylon insert lock nut, tight enough that the tension don't unravel it.
Wednesday, September 23, 2009
 We've been having problems with greenscreening. We thought we had a good result, but we really didn't look close enough. We're using an AE plugin; Keylight 1.2. Which is a great pice of software, that's been used for a zillion Hollywood films. Point being, it works just fine.
The main problem is always the same; we key out our green, but it also removes some pixels from our puppet, resulting in a hideous dancing grain. It's been frustrating, because it feels like we're doing everything right. We've been reading the instructions. And Dave has the photographer training. Switching the Keylight view to 'screen matte' shows us that we've got a clean result. Likwise with 'status view'. The only thing that killed the grain was switching to 'Intermediate view', which disables the spill suppression. So our problem is spill. But we put the puppet on a black base (instead of a green one); same result. The tiniest bit of reflection from the not-quite-matte black was giving us a teeny bit of spill, which meant grain. We figure we can disable the spill suppressor - doing so results in a bit of a green halo around the subject - and then clean up the rest with different keying tooks, choker mattes, etc. But we don't want to do it that way. The most recent shot took 20 minutes to animate. If it takes 45 minutes to key, that's an obvious problem. What we want is to pick our matte colour, and poof, have a passable result right away without touching a setting.
We tried using blue instead. It totally solved the problem. There was a teensy bit of grain in a test case wherein our foreground blue was very different from our background blue, and the foreground blue area was larger than it needed to be - we could have blocked it off to get a minimum of spill. But a proper test was totally fine. We like to do a few tests, to see where the threshold is for suckage. We're not toally sure why blue works so much better, but it does.
Sunday, September 20, 2009


We've been delving deep into greenscreening and keying. Not nearly as easy as we thought. That is to say, it looks good, until you look closer. I've found the answer to successful greenscreening; read the manual. Keylight explains all and in depth in the .pdf that comes with the plugin. It's pretty powerful software - you can key out some pretty heinous stuff with that thing.

I haven't posted anything in while because i've been too busy working. Which is probably a good sign. What we been doing? Made another puppet - the 'Tied-Up Model'. We used to call him 'the Chained Model'. But rope works better. So we call him 'Chainey'. I crapped out another animatable head in record time. He justs opens his mouth. But that'll do for this guy. I was racing to finish his costume for a greenscreen session, which was a mistake. I ended up altering his jacket substantially, redoing his sleeves onces, and his vest three times. Slow is fast, I have to remember.
I like the hat. It's period.
Friday, September 11, 2009
Been doing loads of other work too. Too busy to post any pictures. Which is probably a good sign. I'm trying to work 10 hours a day minimum, and 3 hours a day on those days when i'm at my day job. It's pretty exhausting. Been more like 12-13 hours a day recently. There's always more work to do; yesterday, for example: dipped two sets of hands in latex multiple times, built them up, etc, poured resin many times for the 'tied model's' head, made the eyes, located their final positions, epoxied them into place, built the neck armatures, tested out various joint epoxies, tested out various faux-suede staining methods, worked on redoing Cornelisz's head motion control pins, etc. etc. etc.


A couple little colour tests. We stumbled on a neat HDR technique; altering the colour of the original three exposures. Does some neat stuff to the colour; in particular, it leaves brighter colours bright (like props) and sucks the orange out of the wood. These aren't great examples of this technique. But you get the idea.


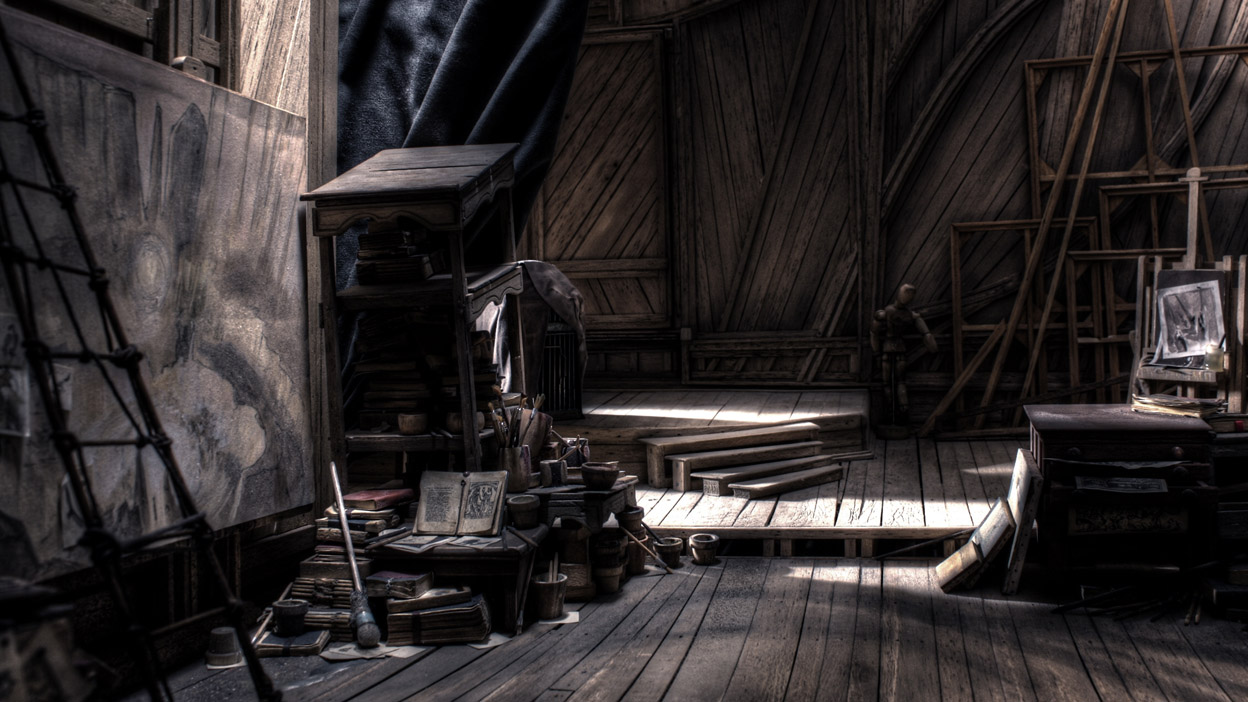
After hours and hours of lighting, we've finally settled on the final lighting for the scene. And with small variations, most of the scenes in this set. There's no longer anything we can or want to do to it. We finally got the light on the back wall just how we want, after going back and forth and fiddling with it dozens of times. This particular shot won't likely even be used in the film; Dave is going to tweak the colour and levels of it, and us it as the 'master' for the set. Meaning we'll make the rest of the shots match.
We also shot the majority of the background stills for the current scene (Scene 4). So we have something that will actually be in the movie. Far out.
Sunday, September 06, 2009


 The lighting sure is finicky. The HDR processing makes it more so. It's pretty much done, though. We're getting reasonably consistent results, and keep going back to the same set-up. It's not as simple as making it look good; there's other considerations too. A great deal of the backgrounds that'l constitute most of the footage will be just the back wall, up close. I've found that too much contrast in the back wall is distracting when you stick a puppet image in there. For example. We're also not really sure exactly how warm or cool the thing is going to be overall. Probably pretty cool. It's more evil.
Friday, September 04, 2009
 We've put some gels on our lights; tungsten to daylight conversion. Dave was finding that he had to push the raw exposures harder than they should be pushed to correct the colour. HDR does some pretty whacky stuff; one picture will come out great, and another nearly identical one, with the light moved slightly, will come out dark and murky. We're learning some stuff though.
On this one, I crudely photoshopped in some haze. I think I like it.
Thursday, September 03, 2009
.jpg)

.jpg)
Wednesday, September 02, 2009
We've spent three evenings in a row now in the studio, working on the lighting. Changing the fill, moving it around, putting all sorts of cards on it, shoot-throughs, scrims, putting gels on the lights, etc. etc. etc. Still ain't working that great. The main problem is that we can never really see what we're getting until we get it home. Hard to see on the laptop screen. As well, because we're processing the shots with HDR tone mapping, the results are erratic as hell.
Gonna have to go back there and work on it with a real monitor.
Gonna have to go back there and work on it with a real monitor.
Tuesday, September 01, 2009


Monday, August 31, 2009
 We finally got us some real lighting now. 3 x 250watt heads on stands, barn doors, focus, scrims, etc.
Here's a couple test shots. They're too dark and contrasty, and are overprocessed. But you get the idea. We've been battling with the fill - the top picture is a better photograph, but I found there's something essentially wrong with it. Looks a bit fake. Like there's a spotlight shining on the set.
Tried a fill coming from overhead instead; seems to work better.
Monday, August 24, 2009

Sunday, August 23, 2009
Here's one of the practice runs from today. I'mma go back in there and do more a bit later. I'm going to use an actual video camera (that I can plug in to a power source) for the live feed through Dragon. Using the actual shooting camera for the live feed murders the batteries.
Animation ain't anywhere near where it needs to be, but there's hope.
The screenscreen behind the puppet looked terrible; I had no intention of keying it out, so therefore didn't attempt to light it. But good ol' Keylight 1.2 still dropped it out pretty good. Not good enough for a pass, but still suprisingly well.
Here's a bit from our reference footage session. Spent some hours in the studio today trying to use the stuff with Dragon (stop motion software). Not sure how useful it's going to be. Had about 5 half-hearted tries at various things. Just a pile o' suck so far. I'm just going to have to spend alot of hours in there, going through the shots and movements til I become very familiar with them, get better at animating, and become well-aquainted with the limitations of the puppets.
Saturday, August 22, 2009
Here's how we done our successful greenscreenin':
Bought us up some lime green fabric.
Stetched it flat as a board with thumbtacks.
Put one spot on it; should have been lit more evenly, but it worked fine with this test.
Put the puppet a good 6' away from the greenscreen.
Got us a good lookin' mid exposure.
Slapped the resulting .jpegs into After Effects CS3, as a .jpeg image sequence.
Went to 'keying', and fired up 'Keylight 1.2'. I think it's a plugin that Adobe bought and made standard. Works real good.
That was it. Dropped the green like a rock. Even keyed out thin, partially transparent strands of hair perfectly.
Tuesday, August 18, 2009


 The process is coming together pretty good. Started off by setting up out various camera angles with set-scale styrofoam mannequins. Here's some. We're going to shoot/cut this scene in a pretty traditional way; over the shoulder shots, simulated multi-camera setups, 'coverage', etc. We jut picked some angles that would get us what we need, and we'll cut between them.
Spent a couple hours last night filming animation/camera movement reference footage - have the first half of this scene (about a minute) in the bag. There was two camera for each shot - handheld moving camera, and a camera on a tripod. The tripod-cam is for the animation reference.
The next step is to cut the footage into a scene, and export the corresponding animation reference clips into single clips.
Then we'll be animatin'.
Friday, August 14, 2009
Been doing lots of stuff. Mostly stuff that I can't post pictures of. I'll put some up soon.
We did a green screen test. It was awesome; Dave had a light meter and everything. Light meters are sweet - they look all professional and junk. The test seemed to turn out okay, though we didn't manage to light the greenscreen evenly due to lack of wattage. And we also failed to make it smooth enough. Doing another test very soon.
I spent quite a few hours with the 'Interior Studio; set, positioning little crude foam mannequins of the characters, figuring out the shot angles. I decided to do it like one would do a television series; instead of one unique shot after another, i've got different 'cameras'. Camera 1 is over-the-shoulder Johannes, looking at Cornelisz, another is OTS Cornelisz looking at the model, etc. We'll film our reference footage to match the 'cameras', and then cut the whole thing together in a logical pragmatic fashion.
We had a filming session last night - didn't work. Couldn't get big enough movements out of our actor, and we ran out of time before we could remedy it. Gonna do it myself next time.
Saturday, August 08, 2009
We've been doing more stuff that I can't post pictures of. Just boring old words.
Been testing out fake camera movement; we've got a plan/technique.
Here's the routine for a shot;
1. Film an actor acting out a motion, with a DV cam, on a tripod, wide enough to catch all the action.
2. Film the same action with a DV cam, but with the camera moving to follow the action and framed up approximately how the final shot will be. This is filmed with a white back drop covered in black crosses; reference marks.
3. Shoot the animation, wide enough to encompass all the camera movements. Shooting to be done against a greenscreen.
4. Using the After Effects motion tracker plugin (in which reference points are anaylzed and followed automatically by the computer), duplicate the camera movement from step 2.
5. Apply the auto-tracked movement to the animated footage.
6. Drop out the green via After Effects.
7. Drop in a jpeg behind the character, with the same motion tracker movement applied.
8. If the character is far enough from the wall that the greenscreened puppet should be moving at a different rate than the background (not needed for most shots, in which the character is 2'-3' from a wall - reallife scale), use the AE parallax function to move them at different rates.
Result; natural, real off-the-cuff lively feeling camera movement. And it's actually really fast to do. And, the best motion takes can be selected.
We've got the scene planned out, reference footage shot (just test footage so far). Going to go in Sunday, and test out the whole process. Once the routine is reasonably set, we'll film the reference footage, and that's it, we're filming finally.
Monday, August 03, 2009
VICTORY
After a long war with animated HDR photography, we finally win. Found the holy grail. HDR being a process whereby three exposures are combined into one. There's different uses for this; one is producing a very clear, crisp nice photograph. The other is 'tone-mapping', generating a non-real looking whacked-out image with incredible detail and texture. We did test, after test, after test, changing every variable we could think of. The result was always the same - an extremely strong flicker; in the areas where strong darks meet strong lights, the light would dance in an atrocious fashion.
There's two different controls for increasing HDR whackiness (referring specifically to Photomatix Pro); light smoothing, and luminosity. All the tests involved changing the luminosity. Even dialing the luminosity back to a barely-HDR setting resulted in the exact same horrible flicker. The other whacky setting is 'light smoothing'; there's five settings - very high, high, etc. 'Very high' is the most reasonable setting, 'high' is getting a bit silly, and the other three aren't worth talking about. Suprisingly, changing 'light smoothing' from 'very high' to 'high' eliminated the flicker altogether. We processed the same frames with over the top ridiculous settings, still came out clean as a whistle.
However, the 'high' setting of 'light smoothing' pulls some pretty weird highlights out of some strange areas. All the recent tests have involved a completely still setup - no moving camera. It remains to be seen what happens with that.
Results to be posted shortly.
Sunday, August 02, 2009
Being doing other film business these days. Not much that I can show pictures for.
Redid the storyboards for Scene 4; the scene in which Cornelisz expounds upon his idea of beauty via an awkwardly-tied model, and then sets a large bird on Johannes. This is going to be our 'tooling' scene, in which we work out the whole process and workflow. I'm expecting it to take longer than the other scenes.
Going to get together with the crew today and go over the storyboards; print them out big, and stick them up on a wall all together. They've already been altered once thanks to Mike's input. It's not that they're better directors/storyboard conceivers than me, it's just that they have a fresh eye. Which is essential.
Also been talking other business; we've decided to keep the Chinatown studio for five months, tentatively. We figure if can't get alot done in five months, we're beyond help anyways. I hope to do alot more than one scene in that time. Hopefully, all the shots involving the Interior Studio set filmed, at the very least. As soon as those are done, we'll drop the studio.
I've been running a battery of HDR tests, trying to remove the flicker. Nothing seems to help, including a UPS (uninterrupted power supply). Going to try shooting RAW files next; HDR seems to really hate .jpegs. These tests are key - if we simply can't do animated HDR, it's going to change the storyboards (the boards currently involve a moving camera, i.e. animated HDR).
The clock is ticking now, which is good. Gives a sense of urgency. Trying to do all I can right away, without putting stuff off.
Once we get the HDR question settled, we'll finalize the Scene 4 storyboards. Then, we'll do a 'reference footage' session in the studio, in which we film our friend (who is a good 'body actor') with a pair of digital cameras. This is some pretty complicated stuff - he'll be interacting with another 'body actor', quite closely. But, the set spot they will be greenscreened into ain't a flat floor; there's a raised platform. Should be nice and hard.
Sunday, July 26, 2009
It's hard to tell what the hell you're looking at with this clip. Did a quick bit of animation, then processed the frames (three exposures to each final frame) through the HDR software. The ISO was high and the F stop low and the lighting dim; i.e., non-ideal conditions. The main battle to date has been with flicker. Suprisingly, I found a wee change in camera angle made the difference between horrible and flicker (first clip) and almost acceptlble flicker (last 1 second clip). The battle now is with film grain; to discover to what degree grain is instrinsic to cranked-up HDR settings.
I also found that extreme motion blur barely registers when you're working on as 'shot-on-ones' clip. The effect is much more pronounced when shooting on twos. We're gonna shoot on ones.
Friday, July 24, 2009

We're planning on doing lots of digital manipulation to the shots, blur in particular - this is made comparatively easy by the fact that the puppets will be greenscreened into the backgrounds. I have high hopes for the greenscreening process - there wasn't an attempt at matching lighting with these two shots (puppet and background), but they fit reasonably well.
 Sometimes, when i'm feeling less than thrilled with the results of costume making, etc., i'll photoshop em' into an HDR set pic to see how things are going. With these two, I cranked the HDR settings - pretty over the top. On the top one, I then cranked the contrast. A bit silly maybe, but I think it's neat. Though, just looking 'neat' can be a bit of a trap. The aesthetic has to make sense in context with the story/approach to the story. Rather than slapping on an 'artsy' aesthetic without a second thought.
Thursday, July 23, 2009

The three puppets all together, with the contrast all whacked out. It's getting harder to work on these things - i'd really rather be making finished shots. The magic dies to a degree when everything is closed to finished - you can see how good they are/aren't going to look, and all the final work is just housekeeping. As well, the glitches keep piling up. Eventually they form a big enough pile to be a genuine pile of suck. But I think they can be used to do something good. Haven't seen them yet with proper lighting, and in motion.

 I took off the jacket sleeves; replacing them with separate, thin sleeves. Those other ones were just too stiff - really restriced the arm movement. And Johannes' big scene consists mostly of him waving his arms around.
I'm going to see if I can't finish this costume by tommorrow. Gonna be effecient, and have disiprine.
Monday, July 20, 2009

Friday, July 17, 2009

Johannes, coat and apron. I'm going to sand the jacket to make it nice and threadbare. Also goin to trim the apron a little - don't like the outward flare. Then, I think i'm going to put a wash of green over it, to make it less red looking. So it'll go better with the fawn coloured jacket. Also going to smear lots of paint and grease on the apron.


Sunday, July 05, 2009
Tuesday, May 05, 2009

 Wee hands. They're not great, but they get a pass. Hands are hard. I made them gloved - a bit of cheat.
There's supposed to be some lighting equipment being ordered, but it ain't happening. It's bringing things to a halt, which is kind of bumming me out. Not much has been happening the last two weeks.
Subscribe to:
Posts (Atom)

